MikroTik Router is a widely used network device thanks to its powerful and flexible features. However, to fully leverage the power of MikroTik, it is very important to have the correct and standard MikroTik configuration. In this article, we will guide you on how to configure a MikroTik Router from basic to advanced, helping your network system operate stably and most effectively.
Ways to configure MikroTik
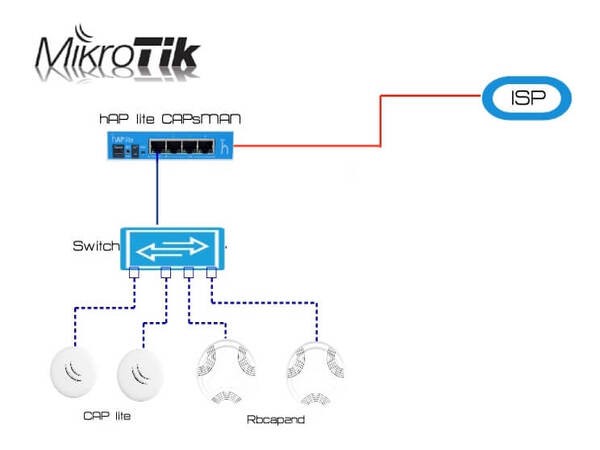
MikroTik is a popular line of network devices with powerful management and MikroTik Router configuration capabilities, suitable for both individuals and businesses. To fully harness the power of MikroTik, understanding the configuration methods is crucial. This section will guide you through the basic and advanced configuration methods on MikroTik.
- Configuring MikroTik via the WinBox graphical interface: WinBox is the most commonly used graphical interface management tool on MikroTik.
- Configuring MikroTik via the WebFig interface: WebFig is a web browser-based management interface.
- Configuring MikroTik via CLI (Command Line Interface): CLI is suitable for users who are familiar with network commands or need to operate remotely via SSH.
- Automatic MikroTik configuration via Script: MikroTik supports creating scripts to automate configuration tasks.
- Configuring MikroTik via mobile app: MikroTik provides an app on Android and iOS for quick device management.
MikroTik configuration is not too complicated if you understand the steps. Depending on your needs and familiarity, you can choose to configure MikroTik via WinBox, WebFig, CLI, or the mobile app. Practice regularly to master your MikroTik device with ease.
Basic MikroTik Router Configuration Guide for Beginners
MikroTik Router is one of the favorite network devices due to its flexible and powerful features, suitable for both individual users and businesses. If you are a beginner, getting acquainted with and configuring this device can be a bit overwhelming. This part of the article will guide you step-by-step to set up a basic MikroTik configuration.
Connecting a computer to the MikroTik Router device
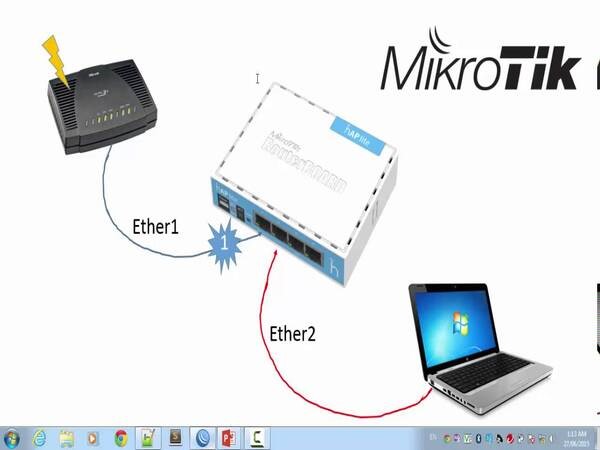
Before starting the MikroTik Router configuration, the first step is to establish a connection between your computer and the device. This allows you to access and manage the Router through the configuration interface. To start the configuration, you need to connect your computer to the MikroTik Router. Do as follows:
- Use an Ethernet cable to connect from your computer to an Ethernet port of the MikroTik Router (usually port ether1).
- Install the WinBox tool on your computer and open the application.
- Scan for the MAC address or default IP address of the Router (usually 192.168.88.1) and log in with the default account:
- Username: admin
- Password: (leave blank).
After a successful login, the MikroTik management interface will appear, allowing you to proceed with the next configuration steps.
Guide to creating a Bridge LAN and IP address for the LAN
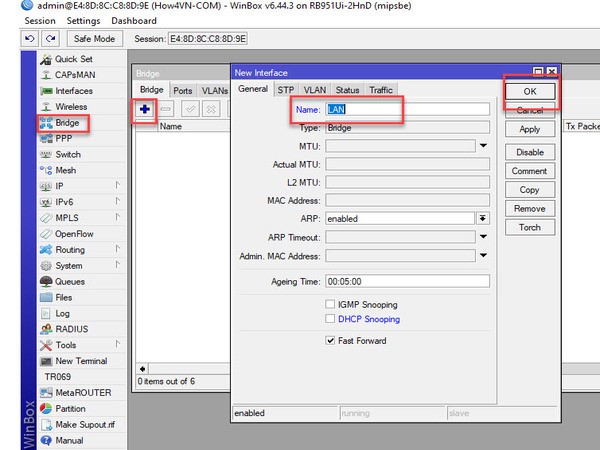
Bridge LAN is an important feature that helps combine multiple physical network ports into a unified LAN. Configuring the Bridge and assigning an IP address to the LAN is the foundation for setting up other network features. The bridge helps to group Ethernet ports into a common internal network. The steps are as follows:
- Go to the Bridge section in WinBox.
- Create a new Bridge, give it a name (e.g., bridge-lan).
- Add the necessary network ports (Ethernet) to the Bridge.
- Example: Add ether2, ether3, ether4 to bridge-lan.
- Assign an IP address to the Bridge:
- Go to IP > Addresses, add an IP address (e.g., 192.168.1.1/24) for bridge-lan.
When completed, all devices connected through the Ethernet ports belonging to the Bridge will be on the same internal network.
Configuring IP address, DNS, and DHCP Server for the LAN
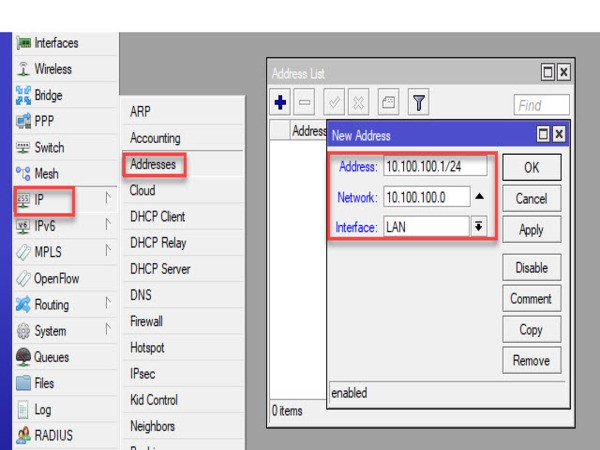
Configuring the IP address, DNS, and DHCP Server is the next step to help the LAN operate effectively. The DHCP Server will automatically assign IPs to connected devices, while DNS supports domain name resolution for easier Internet access. To automatically assign IP addresses to devices on the LAN, you need to configure a DHCP Server. The steps are as follows:
- Set DNS Server:
- Go to IP > DNS, add a DNS address (e.g., 8.8.8.8, 8.8.4.4) and enable the Allow Remote Requests option.
- Create DHCP Server:
- Go to IP > DHCP Server, use the Setup Wizard to create one quickly:
- Select the bridge-lan interface.
- Set the IP address range to be assigned (e.g., 192.168.1.2-192.168.1.254).
- Go to IP > DHCP Server, use the Setup Wizard to create one quickly:
After configuring the DNS and DHCP Server, you have completed an important part of the LAN. Devices on the network will automatically receive an IP and access the Internet more quickly.
Configuring PPPoE Client or DHCP Client
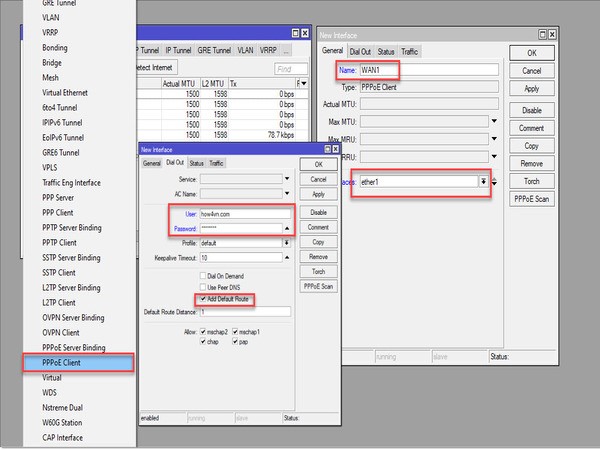
For the MikroTik Router to connect to the Internet, you need to configure a PPPoE Client or DHCP Client depending on the type of connection from your ISP. PPPoE is often used with ISPs that require a login, while DHCP Client is for connections that automatically receive an IP.
Configuring PPPoE Client
With a PPPoE connection, you need to provide the account information supplied by your ISP to set up the Internet connection. Below is a detailed guide to configuring a PPPoE Client on a MikroTik Router.
- Go to Interfaces > PPP > Add > PPPoE Client.
- Select the WAN port (e.g., ether1) and enter the PPPoE account information:
- Username: The username provided by the ISP.
- Password: The password provided by the ISP.
- Enable the Add Default Route option to automatically add a default route.
When the connection is successful, you will see the PPPoE status change to Connected. Don’t forget to check the connection to ensure everything is working stably.
Configuring DHCP Client
If your ISP uses DHCP to assign dynamic IP addresses, you need to:
- Go to IP > DHCP Client, add a new Client.
- Select the WAN interface (e.g., ether1).
- Enable the Add Default Route and Use Peer DNS options.
When the connection is successful, the MikroTik Router will automatically receive an IP address from the ISP.
NAT for Internet access
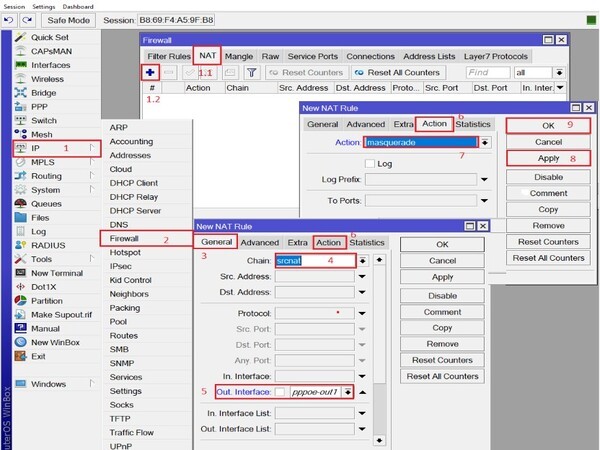
If your ISP provides a connection that automatically receives an IP, configuring a DHCP Client is an extremely simple but essential step. Follow the steps below to set up a DHCP Client on a MikroTik Router.
- Go to IP > Firewall > NAT, add a new rule:
- Chain: srcnat.
- Out Interface: Select the WAN port (e.g., ether1).
- Action: masquerade.
Once the DHCP Client is configured, the MikroTik Router will automatically receive an IP address from the ISP. You can check the Internet connection and are ready to share it with other devices.
Conclusion
Through this guide, you have learned the steps for a standard MikroTik Router configuration, from basic setup to the necessary features to optimize your network. If you follow the steps correctly, your network will operate in a stable, fast, and secure manner. Do not hesitate to continue exploring other features of MikroTik to enhance its use. Good luck!


